|
Many links on this site are Adobe Acrobat files (PDF)  that require Adobe Acrobat Reader. Click on the link below to download your free copy of Adobe Acrobat Reader. that require Adobe Acrobat Reader. Click on the link below to download your free copy of Adobe Acrobat Reader.

PATHFINDER HONOR CATEGORIES

| One of the basic aims of Pathfinders is the development of an ongoing interest in a wide
variety of skills and activities. To fulfil this aim a program has been designed to encourage both group and individual work
in areas of interest to Pathfinders and staff.
A large number of subjects has been selected and are presented as a set of activities which necessitates the Pathfinders
becoming proficient in both skills and theory. When these activities have been completed in any given subject, an application
is made to the local conference office for the award of an Honour token. This is a cloth patch with an appropriate woven symbol
of the particular subject studied.
|
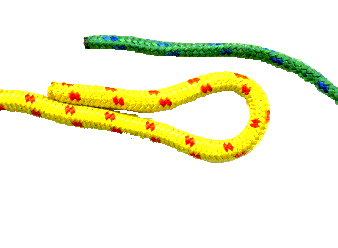
Sheepshank
 |
|
- The Sheepshank is a shortening knot, which enables a rope to be shortened non-destructively.
- The knot is only really secure under tension, it will fall apart when slack. (See tip below.)
|
|
- Tip. Use up to five half hitches each end of the Sheepshank to make the knot more secure, and for fine
tuning the shortening.
- Tip. Never cut ropes to shorten them! Always use a shortening
knot such as the Sheepshank, or coil the excess.
|
Bowline
 |
|
- A commonly used knot to tie a loop in the end of a rope. It has the advantage of not jamming, compared
to some other loop forming knots (for example when using an overhand knot on a large bight to form a loop).
- Form a small loop (the direction is important), and pass the free end of the knot up through the loop,
around behind the standing part of the rope, and back down through the loop.
- A chant used by many to remember this knot is "The rabbit comes out of the hole, round the tree, and
back down the hole again", where the hole is the small loop, and the rabbit is the running end of the rope.
- In the same way that a Left Handed Sheetbend is a Sheet Bend that has the running end
of the rope coming out of the wrong side of the knot, a cowboy bowline is a bowline that also has the running end of the rope
coming out of the wrong side of the knot. It suffers the same problems as the left handed sheet bend.
|
|
- Tip. Don't be afraid to use this knot to form a loop of any size in rope.
- Tip. To quickly identify if you have tied the Bowline normal or left handed, check to see that the running
end exits the knot on the inside of the loop.
- Tip. For added security, finish the knot with a stop knot such as a Figure Eight knot
to remove any possibility of the Bowline slipping.
- Tip. If you use this knot in a man carrying situation - perhaps a rescue where a harness is unavailable
- then you MUST use a stop knot as mentioned above.
|
Clove Hitch
 |
|
- Use to attach a rope to a pole, this knot provide a quick and secure result. It rarely jams, and can
in fact suffer from the hitch unrolling under tension if the pole can turn. Often used to start and finish lashings.
- With practice, this can be easily tied with one hand - especially useful for sailors!
|
|
- Tip. If you are in a situation where the clove hitch may unroll, add a couple of half hitches with the
running end to the standing end of the knot, turning it into a "Clove Hitch and Two Half Hitches"!
- Tip. When pioneering, use the Round turn two half hitches to start and finish your lashings
instead of the Clove Hitch. It won't unroll, and is easier to finish tying off. It just does not look so neat!
|
Figure of Eight Knot
(Flemish Knot, Savoy Knot)
 |
|
- A useful "Stop" knot to temporarily bulk out the end of a rope or cord, the finished knot looks like
its name. It is superior to using a Thumb Knot, because it does not jam so easily.
|
|
- Tip: The Figure of Eight is useful to temporarily stop the ends of a rope fraying, before it is whipped.
|
Fisherman's Knot
(Angler's knot, English knot, Englishman's bend, Halibut knot, True Lover's bend, Waterman's
knot)
|

|
- The Fisherman's knot is used to tie two ropes of equal thickness together. It is used by fishermen to
join fishing line, and is very effective with small diameter strings and twines.
- Tie a Thumb Knot, in the running end of the first rope around the second rope. Then tie a thumb
knot in the second rope, around the first rope. Note the Thumb knots are tied such they lie snugly against each other when
the standing ends are pulled.
|
- When tying knots in monofilament line, moisten the line before pulling the knot tight. This helps to
stop the line heating up with friction, which weakens it.
Lark's Head
(Cow Hitch, Lanyard Hitch)
-
 |
|
- The Lark's Head knot is used to loosely attach a rope to a spar or ring. The knot has two redeeming features,
it is easy to tie, and it does not jam. However, it will slip fairly easily along the spar, and may slip undone when tied
using man made fibre ropes.
|
|
- Tip. This is a knot to be avoided when a secure attachment is required. The Round turn two half Hitches,
and the Clove Hitch are far more secure.
|
Reef Knot
(Square Knot)
|

|
|
- An excellent general purpose knot for tying two pieces of string or twine together, the reef knot is
possibly the most commonly used knot for the job, and is easy to learn. However, it cannot be overly stressed that the Reef
knot is not a long term or secure knot, and it should only be used to finish parcels or bindings. In other cases, use a more
secure method of bending two ropes together, such as a Sheetbend, a Double sheetbend or a
- Fisherman's Knot Unfortunately, the Reef knot can easily change into a slipping Lark's head (see
below), so it should never be used where life or limb are at risk.
- Holding one end of each rope in each hand, pass the left rope over the right, and tuck under. Then pass
the same rope, now in the right hand, over the left rope, and tuck under.
- It is common to chant "Left over Right and Under, Right over Left and Under" when tying the knot. (This
can also be performed as "Right over Left and Under, Left over Right and Under".)
- The reef knot can easliy be undone by gripping one loose end, and pulling it back over the knot, in the
opposite direction, thus straightening the rope which is pulled. The other rope forms a Lark's head knot, and slips off the tugged rope.
- The knot gets its name from its use on sailing ships, when the sails were "reefed" - rolled up and tied
to the cross spar with a reef knot. To release the sail, the sailors would climb the rigging, and work their way along the
cross spar, pulling the top end of the reef knot down. They only had to use one hand, holding on with the other. The weight
of the sail would cause the reef knot to slip, and the sail would be released.
|
- Tip. If you want to tie two ropes together of similar thickness then never use a Reef knot. Only use
it with string and twine when tying parcels, whippings and bindings.
- Tip. Never use this knot to join ropes of two different thicknesses.
| |
Rolling Hitch
(Magner's Hitch, Magnus Hitch)
 |
|
- One of the most underated knots in Scouting and Guiding, the Rolling hitch is used to attach one rope
to a second, in such a manner that the first rope can be easily slid along the second.
- The knot can be considered a Clove Hitch with an additional turn.
- When tension is applied and the ropes form a straight line, the rolling hitch will lock onto the first
rope. When the tension is released, the hitch can be loosened and slid along the first rope to a new location.
- The tension must be applied on the side of the knot with the extra turn.
|
|
- Tip. Use this knot if you have a guy rope with no adjuster. Create a loop on the end of a second rope
which is slipped over the peg. Use a rolling hitch to attach the second rope to the guyline. Alternatively, take the guyline
around the peg and tie the Rolling hitch back onto the standing part of the guyline, above the peg, thus forming an adjustable
loop. This is known as the Tautline Hitch in America.
- Tip. Use this knot when constructing camp gadgets such as a suspended table. A Rolling hitch in each
suspension rope will allow easy adjustment and a level table!
- Tip. When adjustments are complete, lock the rolling hitch into place by using a stop knot such as a
Figure Eight in the first rope, below the Rolling hitch, to stop it slipping.
|
Round turn and two half hitches
 |
|
- Used to secure a rope to a pole, or to start or finish a lashing. Pass the running end of the rope over
the pole twice. Then pass the running end over the standing part of rope, and tuck it back up and under itself, forming a
half hitch. Repeat this for a second half hitch.
- This knot has a redeeming feature - it rarely jams!
|
|
- Tip. Superior to a Clove Hitch for starting and finishing a lashing as the half hitches prevent
this knot from unrolling, as they have the effect of locking the knot. The Clove Hitch looks neater (!) but it has
a tendancy to unroll, and can be difficult to tie tightly when tying off.
|
Sheet Bend
(Flag Bend, Common Bend)
 |
|
- The Sheetbend is commonly used to tie two ropes of unequal thickness together. The thicker rope of the
two is used to form a bight, and the thinner rope is passed up through the bight, around the back of the bight, and then tucked
under itself.
- The knot should be tied with both ends coming off the same side of the bend, as illustrated here. However
it can easily be accidentally tied with the ends coming off opposite sides of the bend, when it is known as the Left
Handed sheet bend The Left Handed Sheet Bend is to be avoided as it is less secure.
|
|
- Tip. If the ropes are of very unequal thickness, or placed under a lot of tension, use a double sheetbend.
|
Left Handed Sheet Bend
 |
|
- This knot is a wrongly tied Sheet bend, a very easy mistake to make. The ends of the ropes should
both come off the same side of the knot, and NOT off opposite sides as shown here. The knot strength is severely reduced,
and this knot should be avoided.
|
|
- Tip. Avoid this knot under all circumstances. Always use a Sheetbend.
|
Double Sheet Bend
 |
|
- The Double Sheetbend is a more secure form of the Sheet bend.
- The thicker rope of the two is used to form a bight, and the thinner rope is passed up through the bight,
around the back of the bight, around again before tucking under itself.
|
|
- Tip. It is particularly useful when the thickness of the two ropes varies considerably, or when a more
secure Sheetbend is required.
Thumb Knot(Overhand Knot)
-
 |
|
- This is the simplist knot of all. It is commonly use to temporarily "stop" the end of a fraying rope.
- The overhand knot is commonly tied in a bight formed at the end of a rope, forming the Overhand Loop.
|
|
- Tip. The Thumbknot jams easily so it is far better to use a Figure Eight knot
to stop the end of a fraying rope.
|
Timber Hitch
 |
|
- Used to attach a rope to a log, or where security is not an issue. This knot tightens under strain, but
comes undone extremely easily when the rope is slack.
- Wrap the rope around the log, then pass the running end around the standing part of the rope. Finally
twist the running end around itself three or four times. (Note: this is only shown twice in the animation.)
|
|
- Tip: Jolly useful for dragging logs back to the camp fire!
| |
Glossary
A very short guide to knotting terminology used on these pages.
This is not an exhaustive list of knotting terms, it just contains some of the more unfamiliar
words that we have used.
If you wish to research the subject further, any good book on knots should have a knotting
glossary.
- Knot
. Strictly speaking, a knot is tied in the end of
a line as a stopper, such as the Thumb Knot or Figure of Eight knot.
- Stopper knots
are used to stop the end of a rope fraying,
or to stop it running through a small hole or constriction.
- Bend
. A bend is used to tie two ropes together,
as in the Sheet Bend
- Technically, even the
Reef Knot is a bend.
- Hitch
. A hitch is used to tie a rope to a spar, ring
or post, such as the Clove Hitch .Hitches can also be used to tie one rope ONTO another rope, as in the Rolling Knot
- Running End
- the end of the rope that is being used
to tie the knot.
- Standing End
- the static end of the rope.
Bight can have two meanings:
-- The main part of the
rope from the running end to the standing end
-- Where the rope is bent back to form a loop.
- Jam - when the knot tightens under tension and
you cannot get it undone!
Lashings

Pioneering
structures are built using a series of knots know as lashings. Lashing use a method of 'wrapping' the rope around the spars,
this 'wrapping' is called binding. The binding of the spars coupled with frapping - binding between the spars so as to tighten
the bindings - create the lashing. There are four types of lashing - square, diagonal, sheer, tripod. Each lashing has a specific
use and its strenghts are best realised by using the correct lashing at each stage of the project.
When lashing spars together
it's important to use ropes of the correct thickness and lenght. For staves and spars up to 30 mm in diameter, use sisal.
For spars up to 75mm in diameter use light rope.
As to length, 1 meter of rope for each 25mm of the combined diameter of the spars. For example, when using timbers of 75mm
- 100mm spars you will need approx. 7 meters of rope per lashing.
Square lashing:
The square lashing is used whenever spars cross at
right angles to each other. There is three common types of lashings used in this way. The traditional square lashing, the
Japanese square lashing, and the Norwegian square lashing. Each have there own merits however, it is easier to tie the Japanese
and Norwegian lashings. It is debatable as to the difference in strenghts of each lashings as there are too many factors at
play to do a comparitive study. Such factors as the type of spars used and the friction that is created between the spars,
the knot maker and his/her personal strenght in which to tighten the knot and the design of the structure used. So whichever
one you use is a matter of personal choice.
Traditional square lashing:
This lashing is started by tying a clove hitch to the upright
spar under the spar crossing it. The lashing is then bound as shown completeing 4 - 5 turns and with the bindings side by
side. Frapping should then be applied betqween the spars so as to tighten the bindings. The lashing is finished with a clove
hitch around the cross spar.
Japanese lashing:
This lashing is applied by halfing your lashinh rope and
placing a loop around the upright spar below the cross spar. The two ropes are then bound around the spars in the same method
as the tradition lashing except the double rope is used. When the frapping has to be applied the double rope is split and
working each end frapping is applied by crossing over each rope so forming the frapping. One of the advantages of frapping
this way is that you are able to get the frappings tighter because you are pulling against each other. The lashing is finished
by tying a reef knot in the two ends of the lashing rope.
Norwegian Lashing:
The Norwegian method of lashing again
uses a doubled rope. In this lashing however we use the method of pulling against each other used in the frapping of the japanese
metod throughout the lashing process. The lashing is finished with a reef knot ot tie
the two end together.
Diagonal lashing:
The diagonal lashing is used to 'spring' two spars together that do not touch where they
cross. Begin with a timber hitch around both spars . Tighten it to draw the two spars together. Three or four binding turns
are made around one fork , four more around the other fork. The turns should be beside each other not on top of each other.
A number of frapping should be made between the spars to tighten up the lashing bindings. Finish the lashing with a clove
hitch.
Shear lashing
The shear lashing is used to lash to spars together that will utimately
be spread apart to form a shear legs which are used in a number of pioneering projects. This lashing can also be used to join
two spars together so as to give you a longer spar. When the lashing is used in this way you need to tie two lashings one
at each end of the joint. The lashing is made by making a clove hitch around one of the spars and then binding the two spars
together by a number of turns side by side, usually about eight turns. When the binding is complete, a number of frappings
are tied between the spars, finishing the lashing with a clove hitch around the second spar. You can now open the spars to
form your shear legs.
|
end together.
Diagonal lashing
The
diagonal lashing is used to 'spring' two spars together that do not touch where they cross. Begin with a timber hitch around
both spars . Tighten it to draw the two spars together. Three or four binding turns are made around one fork , four more around
the other fork. The turns should be beside each other not on top of each other. A number of frapping should be made between
the spars to tighten up the lashing bindings. Finish the lashing with a clove hitch.
Shear lashing
The shear lashing is used to lash to spars together that will utimately
be spread apart to form a shear legs which are used in a number of pioneering projects. This lashing can also be used to join
two spars together so as to give you a longer spar. When the lashing is used in this way you need to tie two lashings one
at each end of the joint. The lashing is made by making a clove hitch around one of the spars and then binding the two spars
together by a number of turns side by side, usually about eight turns. When the binding is complete, a number of frappings
are tied between the spars, finishing the lashing with a clove hitch around the second spar. You can now open the spars to
form your shear legs.
|
Tripod lashing:
The tripod lashing is used to create a tripod with three spars. Start the lashing by placing
the three spars side up side ends to ends butts to butts. Start with a clove hitch on one of the outside spars and weave the
rope around the spars in a figure of eight motion. There should bve eight or so bindings side by side before you should apply
a number of frappings between each spar. Finish the lashing with a clove hitch on the opposite outside spar. The three spars
should then be lifted upright before the legs are spread. This lashing unlike other must not be overtight otherwise it will
not be possible to spread the legs correctly.
Doubled Sheet Bend
Knots Continue
How to tie knots
 |
|
| |
The manuals are got from
Union Offices
CKC
ABC Bookshop
Shauri Moyo
|
|
|
|
|
 |
|
Browse the alphabetical links below for the latest requirements in over 250 types of AY Honors. All AY
& Division Honors listed here are in Adobe Acrobat format. Each file is approximately 440 KB. If the file has an "*" next
to the title, that means that there is both a basic and advanced AY Honor available for download
Click Here for AY Honor Manual
Adra Honors-New
|
|


%20Knot)